Thursday, June 30, 2011

6120c Light Solution

This tutorial is about how to repair 6120c light problem. This problem usually occurs when the phone is dropped intentionally or unintentionally causing IC and electronics component to malfunction.


6120c light
6120c light solution


Procedure:

1. First try to replace the coil. Refer to the image above. If no luck proceed to 2.

2. Replace betty IC. In my experience 6120c light problem especially with no light in the keypad as well is done by replacing Betty IC.

3. Finally if still no light try to replace the diode from image I manage to get a replace for diode in the 3100 / 6100 board.


I hope at this point you already fix your 6120c light problem.

If you want to learn how to repair cell phone then ;

Start your mobile phone repair training now
Wednesday, June 29, 2011

iPhone repair Guide

This iPhone repair guide is a comprehensive tips, tricks, guides and tutorial gathered through years of experience in servicing iPhone


iPhone repair guide
iPhone repair tutorial


If you enroll yourself in this program you will enjoy these easy guide in repairing iPhone.

First you will have access to Easy To Follow Step By Step Instructions in PDF format. There are Complete Pictures To Go Along With The Instructions.

You will have the skills necesseary to fix you own iPhone or go into your own business fixing other people iPhones.

You will enjoy Full Online Support If Needed To Help You. You will have Instant Download Access, Access to Textbook/ Picture Tutorial Guides, Iphone Repair Resources. You will have also hints on where to get your tools and parts to repair your Iphone. Guaranteed 24/7 Technical Support And Much More...


We've fixed many Iphones, and have put every step of our repairs into these guides. These step by step guide will have you using your favourite App. in no time at all.

Our guides has illustrated photos of an Iphone repair. Follow along and confirm your work with the pictures in the books . Iphone repairs has never been so easy.

Because we have repaired many Iphones using the techniques found in these Repair Guides, this eBook will show guaranteed methods of fixing your Iphone. These methods have been used successfully numerous times by regular people just like you.

Why send your Iphone out to be fixed and pay $150 dollars or more when you can download this eBook right now and have it working again?

You many just want to change the casing or front face because of scratches , your iPhone falls and the screen cracks, or the wifi stop working . Many different problems are resloved in these guides .

Start my iPhone Repair Guide Training
Monday, June 27, 2011

2600c unlock security code

In this tutorial you will learn how to flash 2600c to unlock security code


This unit was brought to me by my regular customer here in my shop. I tried to reset the factory settings but it would not work. After trying two to three times I decided to flash the phone.

Tools:
Jaf tool box
3 in 1 easy cable

Procedure:

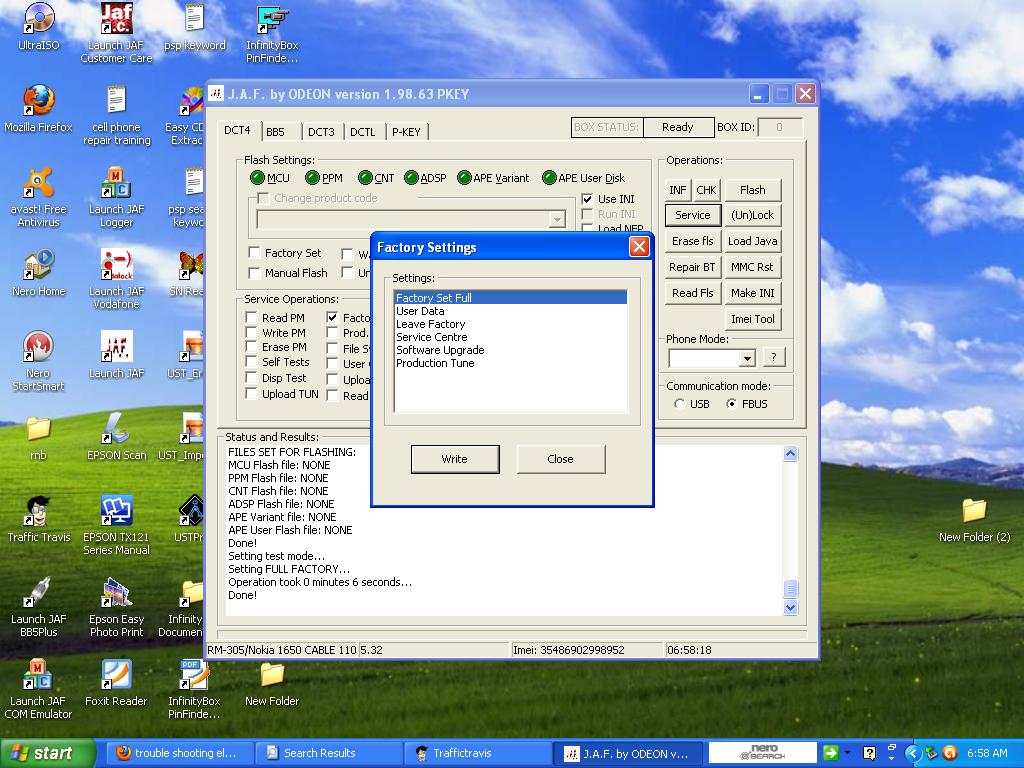
1. Open Jaf software. Check factory set.

2. Load MCU and PPM files

3. Tick Flash

4. Wait until the software finish.

5. You are done.


Screenshot:

unlock security code


Logs:

Getting MCU ID

MCU ID: 0x3162
FLASH ID0: 220800EC <=> SAMSUNG (SEC) -> K8F5615ETM/K5G5629ATD Addr0: 0x01000000 - 0x01FFFFFF, SectorSize0: 11
FLASH ID1: 00010000 <=> Flash -> not used Addr1: 0x02000000 - 0x02FFFFFF, SectorSize1: 0
First 16 bytes: AD 7E B6 1B 00 FF 10 40 00 00 00 00 00 00 00 00
Checking RAM for ALGO...
Algo is ready...
Checking FAID calculation...
P-key nokia module version 01.02
Done!
Phone Restarted...
Phone Type:
FILES SET FOR FLASHING:
MCU Flash file: NONE
PPM Flash file: NONE
CNT Flash file: NONE
ADSP Flash file: NONE
APE Variant file: NONE
APE User Flash file: NONE
Phone Type:
FILES SET FOR FLASHING:
MCU Flash file: C:\Program Files\Nokia\Phoenix\Products\rm-340\rm340__06.82.mcusw
PPM Flash file: NONE
CNT Flash file: NONE
ADSP Flash file: NONE
APE Variant file: NONE
APE User Flash file: NONE
Phone Type:
FILES SET FOR FLASHING:
MCU Flash file: C:\Program Files\Nokia\Phoenix\Products\rm-340\rm340__06.82.mcusw
PPM Flash file: C:\Program Files\Nokia\Phoenix\Products\rm-340\rm340__06.82.ppm_ej
CNT Flash file: NONE
ADSP Flash file: NONE
APE Variant file: NONE
APE User Flash file: NONE
Phone Type:
FILES SET FOR FLASHING:
MCU Flash file: C:\Program Files\Nokia\Phoenix\Products\rm-340\rm340__06.82.mcusw
PPM Flash file: C:\Program Files\Nokia\Phoenix\Products\rm-340\rm340__06.82.ppm_ej
CNT Flash file: C:\Program Files\Nokia\Phoenix\Products\rm-340\rm340__06.82.image_ej
ADSP Flash file: NONE
APE Variant file: NONE
APE User Flash file: NONE
Backing up PM Field 208 as RPL...
Setting local mode...
Reading IMEI...
Reading IMEI data...
Building RPL backup file...
C:\Program Files\ODEON\JAF\ProgData\351946032013160_imei_backup_957276.rpl
Done!
Backup imei OK!
MCU: C:\Program Files\Nokia\Phoenix\Products\rm-340\rm340__06.82.mcusw
Booting phone...
FILES SET FOR FLASHING:
MCU Flash file: C:\Program Files\Nokia\Phoenix\Products\rm-340\rm340__06.82.mcusw
PPM Flash file: C:\Program Files\Nokia\Phoenix\Products\rm-340\rm340__06.82.ppm_ej
CNT Flash file: NONE
ADSP Flash file: NONE
APE Variant file: NONE
APE User Flash file: NONE
FILES SET FOR FLASHING:
MCU Flash file: C:\Program Files\Nokia\Phoenix\Products\rm-340\rm340__06.82.mcusw
PPM Flash file: NONE
CNT Flash file: NONE
ADSP Flash file: NONE
APE Variant file: NONE
APE User Flash file: NONE
FILES SET FOR FLASHING:
MCU Flash file: NONE
PPM Flash file: NONE
CNT Flash file: NONE
ADSP Flash file: NONE
APE Variant file: NONE
APE User Flash file: NONE
Phone Type:
FILES SET FOR FLASHING:
MCU Flash file: C:\Program Files\Nokia\Phoenix\Products\rm-340\rm340__07.60.mcusw
PPM Flash file: NONE
CNT Flash file: NONE
ADSP Flash file: NONE
APE Variant file: NONE
APE User Flash file: NONE
Phone Type:
FILES SET FOR FLASHING:
MCU Flash file: C:\Program Files\Nokia\Phoenix\Products\rm-340\rm340__07.60.mcusw
PPM Flash file: C:\Program Files\Nokia\Phoenix\Products\rm-340\rm340__07.60.ppm_el
CNT Flash file: NONE
ADSP Flash file: NONE
APE Variant file: NONE
APE User Flash file: NONE
Phone Type:
FILES SET FOR FLASHING:
MCU Flash file: C:\Program Files\Nokia\Phoenix\Products\rm-340\rm340__07.60.mcusw
PPM Flash file: C:\Program Files\Nokia\Phoenix\Products\rm-340\rm340__07.60.ppm_el
CNT Flash file: C:\Program Files\Nokia\Phoenix\Products\rm-340\rm340__07.60.image_el
ADSP Flash file: NONE
APE Variant file: NONE
APE User Flash file: NONE
Backing up PM Field 208 as RPL...
Setting local mode...
Reading IMEI...
Reading IMEI data...
Building RPL backup file...
C:\Program Files\ODEON\JAF\ProgData\351946032013160_imei_backup_959276.rpl
Done!
Backup imei OK!
MCU: C:\Program Files\Nokia\Phoenix\Products\rm-340\rm340__07.60.mcusw
Booting phone...
MCU ID: 0x3162
BOOT file: C:\Program Files\ODEON\JAF\Flash\u3_2nd.fia
Loader version: 04.46.01 -> Revision: 0007
Boot size is 0x09A8
Boot is ready...
FLASH ID0: 220800EC <=> SAMSUNG (SEC) -> K8F5615ETM/K5G5629ATD Addr0: 0x01000000 - 0x01FFFFFF, SectorSize0: 11
FLASH ID1: 220800EC <=> SAMSUNG (SEC) -> K8F5615ETM/K5G5629ATD Addr1: 0x02000000 - 0x02FFFFFF, SectorSize1: 11
First 16 bytes: AD 7E B6 1B 00 FF 10 40 00 00 00 00 00 00 00 00
Flash ID is 0x0822EC00
Flash loader is C:\Program Files\ODEON\JAF\Flash\u3_amd.fia
Loader version: 04.46.01 -> Revision: 0007
Loader size is 0x7528; Loader chk: a2
Loader is ready...
P-key nokia module version 01.02
MSID: 84FDE1C5E21A9533E96D0AEE81
MSID decoded: 2C40BAE900C906E2AA000000
FAID: 7A496353ED1C2E13212C3669
Operation took 0 minutes 12 seconds...
Erasing...
Found 2 interval(s) to erase
Erasing area: 01000000 - 0101FFFF...
Erasing area: 01020000 - 01C3FFFF...
Operation took 0 minutes 35 seconds...
Writing...
Perm. Data Restore OK
Operation took 5 minutes 38 seconds...
Restarting MCU...
CNT: C:\Program Files\Nokia\Phoenix\Products\rm-340\rm340__07.60.image_el
Booting phone...
MCU ID: 0x3162
BOOT file: C:\Program Files\ODEON\JAF\Flash\u3_2nd.fia
Loader version: 04.46.01 -> Revision: 0007
Boot size is 0x09A8
Boot is ready...
FLASH ID0: 220800EC <=> SAMSUNG (SEC) -> K8F5615ETM/K5G5629ATD Addr0: 0x01000000 - 0x01FFFFFF, SectorSize0: 11
FLASH ID1: 220800EC <=> SAMSUNG (SEC) -> K8F5615ETM/K5G5629ATD Addr1: 0x02000000 - 0x02FFFFFF, SectorSize1: 11
First 16 bytes: AD 7E B6 1B 00 FF 10 40 00 00 00 00 00 00 00 00
Flash ID is 0x0822EC00
File is already converted to 128k page...
Flash loader is C:\Program Files\ODEON\JAF\Flash\u3_amd.fia
Loader version: 04.46.01 -> Revision: 0007
Loader size is 0x7528; Loader chk: a2
Loader is ready...
P-key nokia module version 01.02
MSID: 8485F2A93EF510096AF1D52129
MSID decoded: D26EBAF100C906E2AA000610
FAID: 82F27D60CA866EE5EF06569A
Operation took 0 minutes 10 seconds...
Erasing Content Pack...
Found 2 interval(s) to erase
Erasing area: 02000000 - 02DBFFFF...
Erasing area: 02DC0000 - 02F9FFFF...
Operation took 1 minutes 26 seconds...
Writing...
Perm. Data Restore OK
Operation took 1 minutes 26 seconds...
Restarting MCU...
Operation took 0 minutes 0 seconds...
Extracting Content Pack...
Running: (c) Nokia File Server
CNT Extract OK.
Operation took 0 minutes 5 seconds...
PPM: C:\Program Files\Nokia\Phoenix\Products\rm-340\rm340__07.60.ppm_el
Booting phone...
MCU ID: 0x3162
BOOT file: C:\Program Files\ODEON\JAF\Flash\u3_2nd.fia
Loader version: 04.46.01 -> Revision: 0007
Boot size is 0x09A8
Boot is ready...
FLASH ID0: 220800EC <=> SAMSUNG (SEC) -> K8F5615ETM/K5G5629ATD Addr0: 0x01000000 - 0x01FFFFFF, SectorSize0: 11
FLASH ID1: 220800EC <=> SAMSUNG (SEC) -> K8F5615ETM/K5G5629ATD Addr1: 0x02000000 - 0x02FFFFFF, SectorSize1: 11
First 16 bytes: AD 7E B6 1B 00 FF 10 40 00 00 00 00 00 00 00 00
Flash ID is 0x0822EC00
Flash loader is C:\Program Files\ODEON\JAF\Flash\u3_amd.fia
Loader version: 04.46.01 -> Revision: 0007
Loader size is 0x7528; Loader chk: a2
Loader is ready...
P-key nokia module version 01.02
MSID: 8410E66A38E9280FC9A4BE980D
MSID decoded: 3E4EBAE900C906E2A8000000
FAID: E9F15B52DFB336E5603F00FB
Operation took 0 minutes 10 seconds...
Erasing PPM...
Found 1 interval(s) to erase
Erasing area: 01C40000 - 01FFFFFF...
Operation took 0 minutes 11 seconds...
Writing...
Perm. Data Restore OK
Operation took 1 minutes 11 seconds...
Restarting MCU...
Flashing Done!
Operation took 11 minutes 14 seconds...

After flash processing...
Waiting for phone to boot...
Reading...
Phone type: RM-340, Software version: 07.60
IMEI: 351946032013160
Product Code: 0557449
Resetting PPC...
Setting FULL FACTORY......Setting test mode...
Setting FULL FACTORY...
Operation took 0 minutes 4 seconds...
Done!
Done!
Done!


You may like:  Mobile Phone repair training

How to unlock code

In this tutorial I will teach to you how to unlock code.

In servicing mobile phone every technician must have a skills on how to unlock code.
For demonstration purposes I will use a Nokia 1650. Every type of mobile phone has its own tool box.

Tools:
Jaf tool box  (Nokia)
1100 cable

Procedure:

1. Open the Jaf Software.

2. Connect the 1650 using 1100 cable to the tool box.

3. Tick CHK to determine if there is a good connection from the phone to the tool box.

4. Tick INF to determine the type of mobile you are going to remove the unlock code.

5. Check the box of the factory settings from the service settings. Tick service button

6. Select "factory set full".

7. Tick write. You are finish.

In this tutorial you learn how to unlock code using Jaf tool box for Nokia mobile phone.


Screenshot here:

how to unlock code


You may like:  Mobile phone repair training
Sunday, June 26, 2011

How to unlock a phone lock code

In this tutorial I will teach you how to unlock a phone lock code. For demonstration purposes I will unlock the Motorola C261 phone lock code.


Tools:
Infinity box
x60 cable

Procedure:

After the installation of the infinity box and its driver.

1. Open the Infinity box shell from the desktop shortcut icon.  It will open a new window.
2. Select Motorola from the drop down menu
3. It will open a new window.

4. Settings tab. Select model in this demonstration I choose C261

how to unlock a phone lock code


5. Choose the correct com port in my tutorial COM 8 VPCO (hint use the vcpo)
6. Tick service tab.
how to unlock a phone lock code


7. Power on the mobile phone and connect it to the box using the x60 cable.
8. Tick user/phone/lock code

Logs:

COM8 [VCP0] selected
Device: C261
Device must be POWERED-ON !
Connecting, wait...
Device connected. Working...
current imei: 359416009357190
software version: 0166 MOTOROLA_E58S
flex version: FLEX_90_62_2N03
user code reset Ok

9. Wait for the software to finish

In this tutorial you learn how to unlock a phone lock code and how to use infinity box to remove a motorola phone lock code.

You may like:  Mobile phone repair training

5300 HANG repaired by usb flashing using mxkey

Using the mxkey tool and usb cable you can repair 5300 hang problem.


Procedure:

Open MX KEY software
Load flash files
TICK FLASH


LOGS:

Library version: 1.0.0.9019(20-11-2010), 1.0.0.15042(20-11-2010)
Processing MCU file: rm146__07.20.mcusw
[BB5,BB5 ALGORITHM] size: 14.56 MB
Supported Ids: 0103192101001101, 010C192101001101
Make sure USB cable, Battery and charger are removed from device.
Insert USB cable, Battery back to device(make sure to have fully charged battery).
Insert Charger or Press phone's power button(if flashing doesnt start automatically)
Waiting for USB device ...
Pooling for ADL device ...
Device found: nmwcdnsuc\Nokia USB Flashing Generic, ID: 472EEA3
CMT SYSTEM ASIC ID: 000000010000022600010006010C192101001101 [RAPGSM ver: 1.1]
CMT EM0 ID: 00000232
CMT EM1 ID: 00000353
CMT PUBLIC ID: 26300109A3577056AA644A114E9D7FCE5A818649
CMT ASIC MODE ID: 00
CMT ROOT KEY HASH: BAF3A9C3DBFA8454937DB77F2B8852B1
CMT ROM ID: 191EC665DFAAF68F
Flashing CMT Update Server Data, ULO: 0x3880 bytes
Update Server code succesfully sent to phone.
Flashing CMT Update Server Data, UPDAPP: 0x3CA00 bytes
Update Server code succesfully sent to phone.
Flashing CMT Update Server Data, PASUBTOC: 0x4A9C0 bytes
Update Server code succesfully sent to phone.
Pooling for ADL device ...
Device found: nmwcdnsuc\Nokia BB5 ADL Loader USB Generic, ID: 1329F5E0
Verifying communication to device OK.
Erase size: 16.37 MB
CMT NOR area [00000000-000006BF] erased in 0.406 s
CMT NOR area [000006C0-0001FFFF] erased in 0.031 s
CMT NOR area [00020000-0007FFFF] erased in 1.500 s
CMT NOR area [00080000-000DFFFF] erased in 0.469 s
CMT NOR area [00100000-001FFFFF] erased in 0.719 s
CMT NOR area [00200000-0031FFFF] erased in 4.094 s
CMT NOR area [00320000-0105FFFF] erased in 44.156 s
CMT NOR area [01060000-01067FFF] erased in 0.375 s
CMT NOR area [01068000-0107FFFF] erased in 0.016 s
Flash programming ...
CMT PAPUBKEYS: 7C1A1F5C3DB717937F54455937AF9DA76AA2EE13 (Rap Certificate 30 v1) written.
Programming completed in 2 min 16.375 s
Processing PPM file: rm146__07.20.ppm_i
[BB5,BB5 ALGORITHM] size: 4.41 MB
Supported Ids: 0103192101001101, 010C192101001101
Erase size: 5.50 MB
CMT NOR area [01080000-015FFFFF] erased in 13.187 s
Flash programming ...
Programming completed in 40.750 s
Processing CNT file: rm146__07.20.image_i
[BB5,BB5 ALGORITHM] page size: 64 K size: 4.57 MB
Supported Ids: 0103192101001101, 010C192101001101
Erase size: 9.87 MB
CMT NOR area [01600000-01FDFFFF] erased in 31.812 s
Flash programming ...
Programming completed in 40.110 s
Total time for flashing process(boot+erase+write) was 5 min 25.250 s
Pooling for ADL device ...
Device found: nmwcdc\Nokia 5300 XpressMusic USB Generic, ID: 3108F5A1
Verifying communication to device OK.
Flashing completed in 6 min 7.453 s

Phone Type: RM-146 (Nokia 5300)
SW Version: V 07.20 23-10-08 RM-146 (c) Nokia.
Imei plain: 3598----------------
Product Code: 0557827
Language Pack:
- not available.

SIMLOCK seems to be valid
SUPERDONGLE_KEY seems to be valid
CMLA_KEY seems to be valid
WMDRM_PD seems to be valid
SIMLOCK_TEST passed
SECURITY_TEST passed


Imei net: 3598-------------
Version: SIMLOCK SERVER VERSION 63
Counter: 0/3, 0/10

CONFIG_DATA: 2440700000000000
PROFILE_BITS: 0000000000000000

BLOCK 1: 1=OPEN 2=OPEN 3=OPEN 4=OPEN 5=OPEN, DATA=FFFFFF
BLOCK 2: 1=OPEN 2=OPEN 3=OPEN 4=OPEN 5=OPEN, DATA=FFFFFF
BLOCK 3: 1=OPEN 2=OPEN 3=OPEN 4=OPEN 5=OPEN, DATA=FFFFFF
BLOCK 4: 1=OPEN 2=OPEN 3=OPEN 4=OPEN 5=OPEN, DATA=FFFFFF
BLOCK 5: 1=OPEN 2=OPEN 3=OPEN 4=OPEN 5=OPEN, DATA=FFFFFF
BLOCK 6: 1=OPEN 2=OPEN 3=OPEN 4=OPEN 5=OPEN, DATA=FFFFFF
BLOCK 7: 1=OPEN 2=OPEN 3=OPEN 4=OPEN 5=OPEN, DATA=FFFFFF
Market items is empty, please select the correct products path !

Now power on your phone and 5300 hang problem is solved now.

You may like:   Mobile Phone repair training
Friday, June 24, 2011

Mobile Phone Repair Training

Mobile phone repair training course for people who cannot attend the classes. This course is a distance learning, home study and correspondence type of course to easily learn mobile phone repairing.


Mobile Phone Repair Course


This course is suit for all people from technical background and engineers; even if you are a complete novice you can join and learn the required skills to repair mobile phones.

You will become complete mobile repair professional by completing our course. After completing our cell phone repair training you will be able to repair minor as well as major handset faults.

Mobile Phone Repair Training course outline:

Mobiles basic Electronics
  • Electrical parameters - Current, Voltage, Frequency
  • Mobile electronic Components - Resistors, Capacitors, Diodes, Transistors and LEDs
  • Use of Multimeter - Measuring resistance, capacitance, voltage, batteries
  • Must have skills for cellphone repair training

Mobile Phone Components
  • Mobile Components - Speaker, Mic, Ringer, Vibrator, Charging Connector, Memory, Antenna
  • Batteries - Types of batteries, Standby time, Talk time.
  • Chargers.
  • This is important for cell phone technician training.  To be able to troubleshoot mobile phone, components  familiarization is a must.

Mobile Basic Introduction
  • GSM / CDMA Technology
  • Basic Working
  • Different terms used in mobile phones – Bluetooth, SMS, Memory Cards
  • Different services – GPRS, WAP, 2G, 3G
  • Different Functions – Speed dialing, Call waiting, Call conference etc.

Basic Troubleshooting

  • Tools used for opening mobile Phones


  • Disassemble and Assembly of Mobile Phones.


  • L2 Components testing, troubleshooting and replacement - Display, Speakers, Mic, Vibrators, ringers, Antennas, charging connector.


  • Cleaning method of PCB.


  • Replacement of panels.


  • In repairing mobile phone technician should start with the basic troubleshooting.  Most of mobile problems are done using basic troubleshooting.


  • Advance Mobile Hardware
    • Different sections in mobile phone - PFO section, RF section, Baseband section
    • Introduction to Various ICs and electronic components. - PA, Antenna switch, RAM IC,
    • Cobb, Power IC, Charging IC, CPU (MAD / UPP),filers, Thavo IC, etc.
    • Soldering/desoldering of mobile components.
    • Using blower for removing mobile components.
    • Study of Block diagram and PCB pictorial.
    • Tracing and trouble shooting through circuit diagram.
    • After doing the  basic troubleshooting and mobile phone is not yet repaired advance troubleshooting knowledge is very important.  This is discuss in this mobile phone repair course.

    Unlocking & Flashing Box Guide. 

    • Unlocking and flashing are also included in this mobile phone repair training course.  Please check also my post in unlocking different mobile phones.

    Start Mobile Phone Repair Training Now
    Thursday, June 23, 2011

    About - Gsm and Gadgets Solutions

    This blog is a collection of Gsm and Gadgets solutions.
    Mobile Phone, Psp and iPhone Firmwares, downloads, tutorials, and many more...

    How to fix a Psp

    Do you want to learn how to fix a Psp?

    •  Do you want to try to flash your Psp and you don't know the tools and steps needed right?
    •  Does your PSP have the Blue Screen of Death?
    •  Would you like to be able to replaced a cracked screen?
    •  Would you like to upgrade, downgrade, or tweak your PSP firmware for maximum enjoyment?


    Psp repair guide
     
    How to Repair a Psp Guide


    If you want to optimized the full power of your PSP game system or if you just want to know how to fix Psp game system to save money or you want to put up a Psp repair business then this guide is for you!


    What will you find inside the Easy Psp Repair Guide?

    1. Diagnose and Repair with PSP How to Step-by-Step Instructions Now you can diagnose up to 99% of all PSP system errors, fix them in less time, and do it at a fraction of the cost of traditional repairs. The Easy PSP Repair guide includes detailed photos, video, and step-by-step instructions that will show you how to perform repairs yourself to save you time & money.
    2. Diagnose Error Codes & Recover From System Errors Are you getting strange error codes when you would rather be playing with your PSP? Now you can figure out exactly what they mean and what you need to do to fix them! 
    3. How To Properly Disassemble and Re-assemble Your PSP Taking apart your PSP to perform repairs can be tricky. Learn how to safely take apart your PSP and then put it back together with these expert instructions!  The best PSP how to fix in the industry.
    4. Learn How To Convert Your Entire Home Movie Collection For FREE Now you can convert your home movie collection into Sony MP4 video format so that you can view them on your PSP. Why pay to buy a UMD movie if you already own it on DVD? You will learn what software to use, and how to use it. Best of all it is 100% legal!
    5. Unlock Hidden Features Of Your PSP For Maximum Fun Unlock hidden web browser, turn your PSP into a "mini-PC", and more. You may discover that your PSP can do a whole lot more than play games! :)
    6. How To Effortlessly Replace A Cracked LCD Screen Your screen is the most important part of your PSP. You will learn how to easily replace it without breaking it (again) so your PSP will be as good as new!
    7. Learn How To Read E-books And Web Comics With Your PSP Did you know that you can view eBooks and access web comics with your PSP? Step-by-step instructions are included to show you how to use these little-known features!
    8. How To Check Your PSP For Dead Pixels Dead pixels can ruin your gaming experience. Now you can find out how to identify and fix dead pixels, of any color, so that you can get the most of your system.
    9. How To "Hack" Your PSP System To Use Different Styles Of Memory Cards Discover how you can use your regular, non-duo memory sticks in your PSP! Most regular memory sticks are far cheaper than PRO DUO so this is another great way to save money.
    10. Learn How To Play PSP Games On Your Computer Play your PSP games in a whole new way: Play them on your computer!
    11. How To Troubleshoot Your PSP Wireless Networking Quickly & easily solve your PSP wireless networking problems. Complete instructions are included!
    12. How to upgrade, downgrade, and tweak your PSP Install firmware, troubleshoot battery problems, & maximize your PSP battery life.
    Plus much, much more with over 950 pages of How to fix a Psp!


    Psp repair guide
    Easy Psp Repair Guide
     
    Total Pageviews
    About this blog
    This blog is a collection of Gsm and Gadgets firmwares, downloads, softwares, tools, etc.
    free counters